5 Ways to Convert Triangles to Quads in Any 3D Tool
Quick Summary
- Converting triangles to quads rebuilds a triangulated mesh into four-sided quad faces so subdivision stays predictable and edge loops stay clean for animation.
- Blender’s Triangles to Quads operator (Alt+J) is the fastest automatic route; it merges adjacent triangle pairs into quads across the whole selection in one pass.
- Quad remeshing in Blender, the Quadify Mesh modifier in 3ds Max, ZRemesher in ZBrush, and Quad Draw in Maya add progressively more manual control for dense, sculpted, or hard-surface meshes.
- Neural4D differs from converters by letting you pick Quad topology before a text to 3D or image to 3D generation, then converts Neural4D models to clean quads with AI Retopo, so the conversion step disappears.
Blender ships a dedicated operator for merging triangle faces into quads, but every 3D tool has its own route, and the fastest one depends on the mesh. These are the five proven ways to convert triangles to quads, from Blender’s Alt+J shortcut to full manual retopology, plus a decision guide so you pick the right method the first time.
-
Table of Contents
- Why Convert Triangles to Quads?
- Method 1: Run the Triangles to Quads Operator in Blender (Alt+J)HOT
- Method 2: Rebuild Topology With a Quad Remesher in Blender
- Method 3: Use the Quadify Mesh Modifier in 3ds Max
- Method 4: Merge and Retopologize in ZBrush (Tri2Quad and ZRemesher)
- Method 5: Redraw Topology by Hand With Quad Draw in Maya
- Which Conversion Method Should You Use?
- Where Neural4D Fits: Generate Quad Topology From the Start
- Common Questions on Converting Triangles to Quads
- Get Clean Quad Topology Without the Manual Cleanup
Why Convert Triangles to Quads?
Every mesh is a collection of faces, and the face type changes how the geometry behaves downstream. Triangles are the native language of GPUs, but quads are the working language of artists, and the two roles are not the same stage of the pipeline. Quads exist so that subdivision and deformation stay predictable; triangles exist so the GPU can draw the result.
The clearest reason is subdivision. Catmull-Clark, the smoothing algorithm behind Blender, Maya, and most production surfacing, divides each quad into four smaller quads. Feed it a clean quad grid and it stays even. Feed it triangles and the smoothing produces irregular poles and pinching where flow lines collide. A model destined for sculpting, high-res renders, or smooth shading benefits enormously from quad input.
The second reason is animation. Quads form edge loops, the concentric rings of faces that wrap around a mouth, an eye, an elbow, or a knee. Deformation slides along those loops, which is why characters that bend are modeled in quads. Triangles break loop flow at their diagonal edges, and the break shows up as a pinch or a fold when the joint moves. Retopology is the whole discipline of redrawing this flow, and you can read what retopology covers before you start.
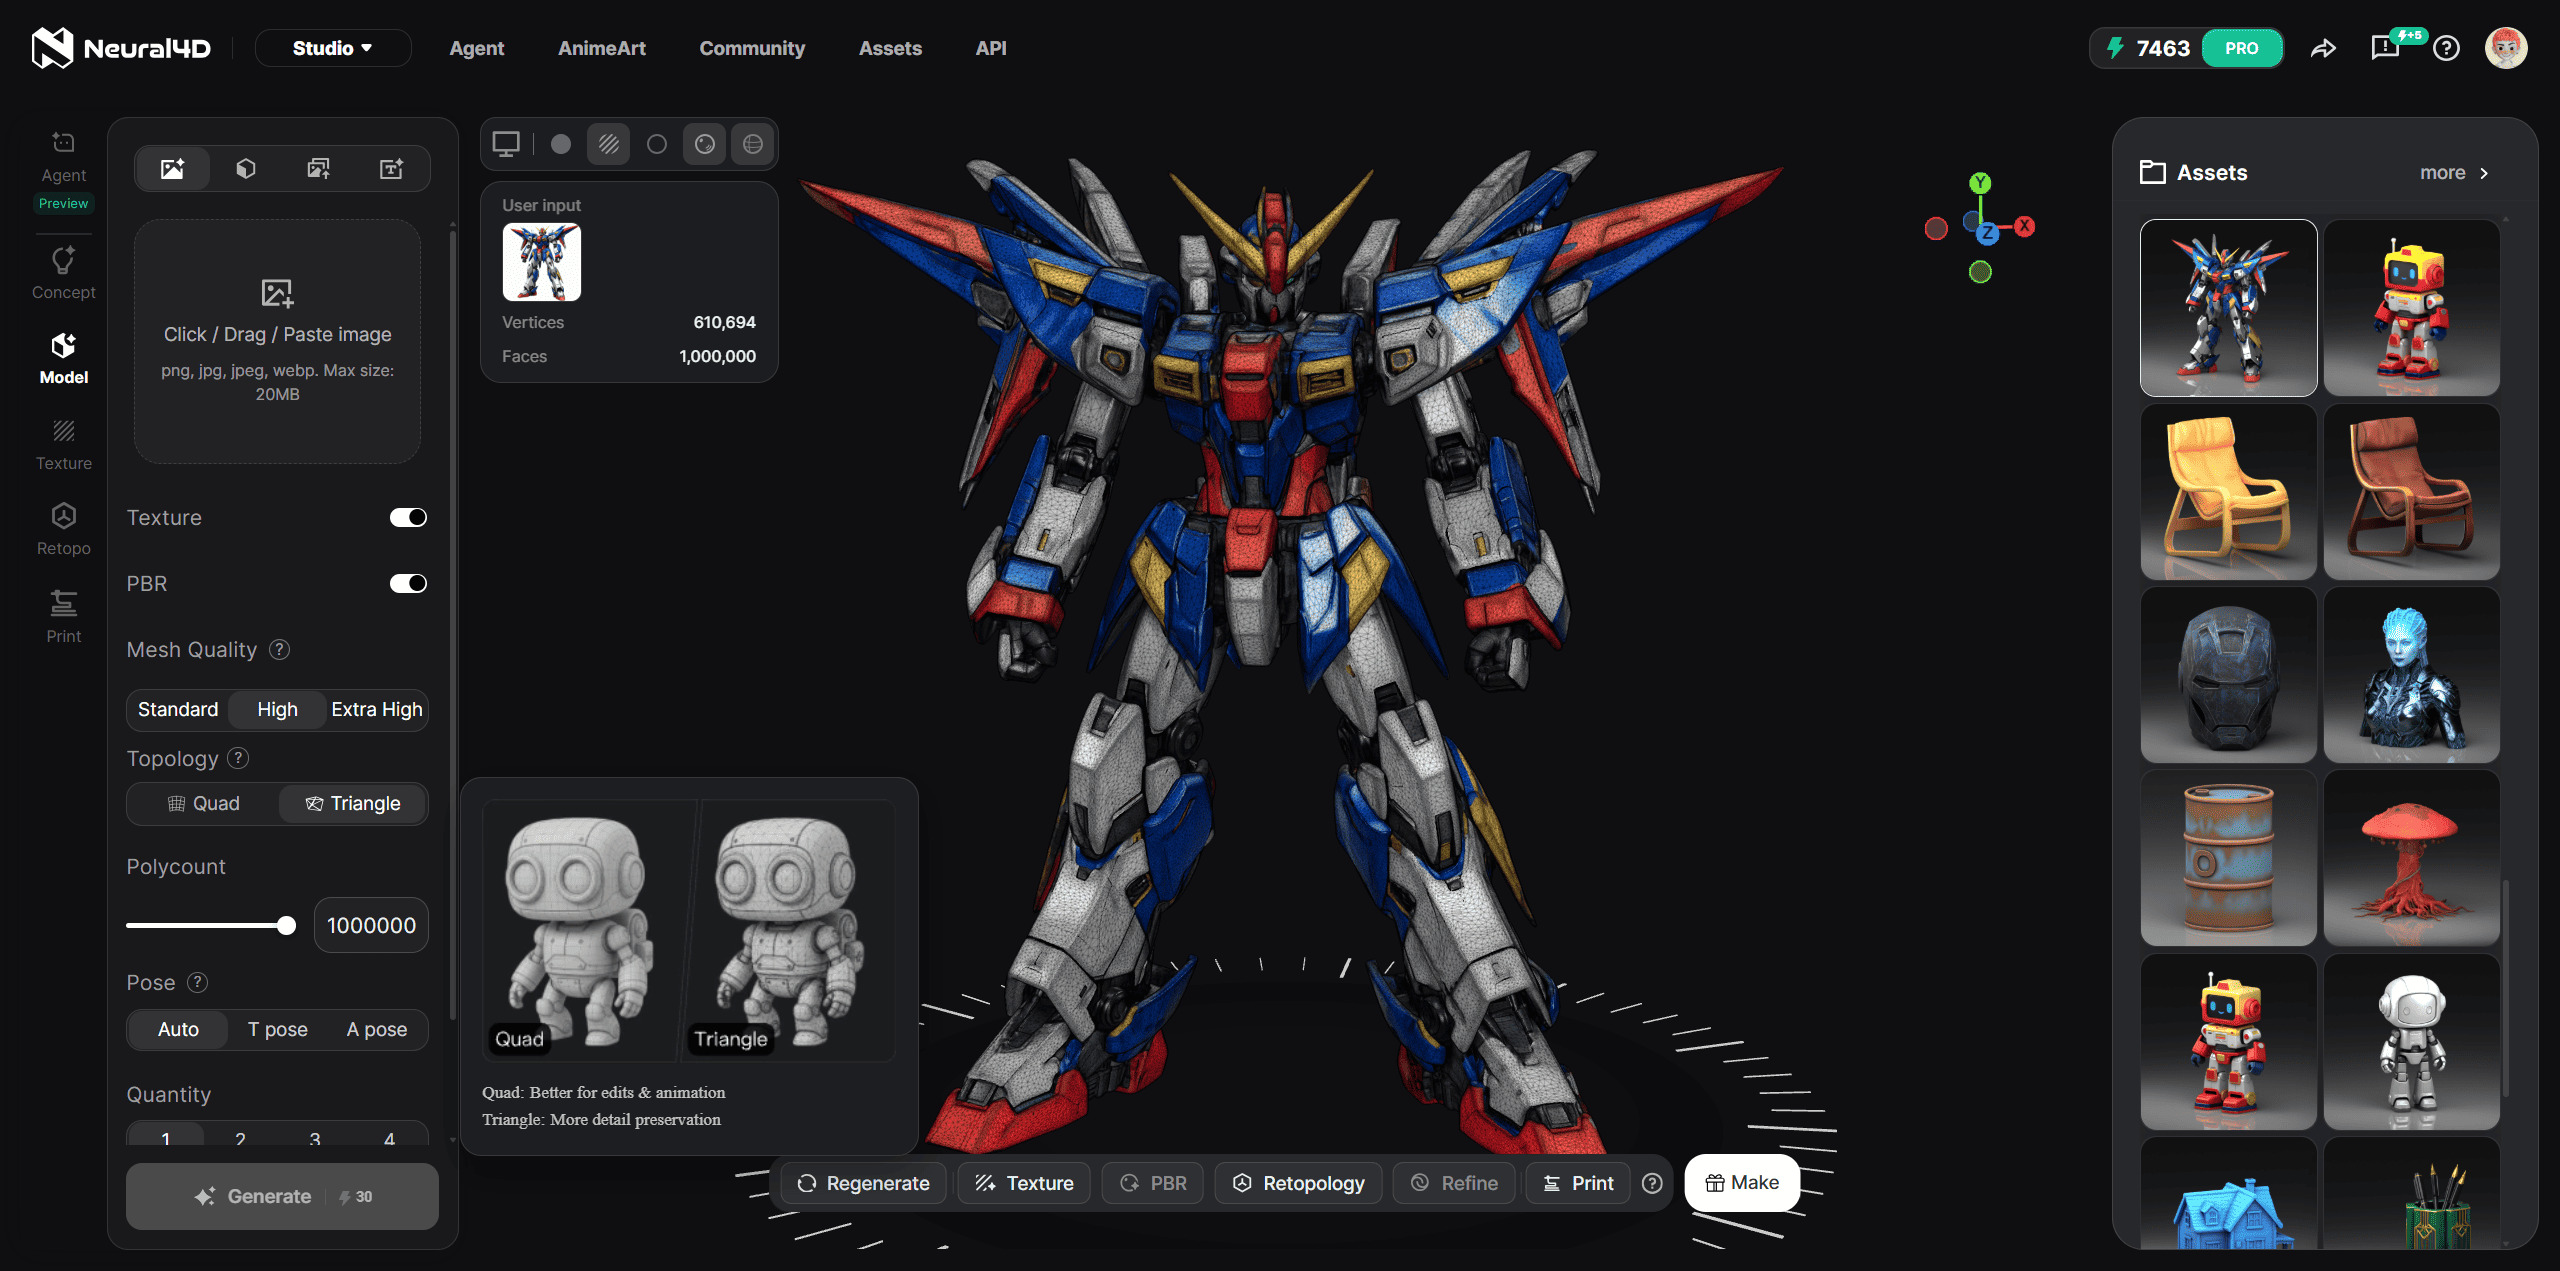
The same shape as an even quad grid and as raw triangles. The quad version subdivides and deforms cleanly.
Now the honest counterpoint. If a model will never deform, never subdivide, and ships straight to a game engine, clean triangles are perfectly acceptable. Game engines and renderers triangulate every mesh on import anyway. The goal is not to eliminate triangles from every scene. The goal is to keep quads where geometry has to animate or smooth, and to keep triangles out of deformation zones. When a file arrives already triangulated and that geometry has to animate, you convert it, and the next five methods are how.
Method 1: Run the Triangles to Quads Operator in Blender (Alt+J)
The most direct way to convert triangles to quads in Blender is the built-in operator literally named Triangles to Quads. It merges adjacent triangle pairs by dissolving the edge they share, and it can process an entire mesh in one pass. This is the first tool to try because it is automatic, non-destructive to the silhouette, and fast.
To convert triangles to quads in Blender with Alt+J:
- Select the mesh and press Tab to enter Edit Mode.
- Switch to Face Select mode with Ctrl+Tab, then press A to select every face. The operator only touches selected faces, so an empty or partial selection converts nothing.
- Press Alt+J, or open Face and choose Triangles to Quads from the menu.
- Open the redo panel in the bottom-left corner of the viewport (F9) and tune the merge settings below.
| Option | Default | What it does |
|---|---|---|
| Max Angle | 40 | Highest angle between the two triangle normals that still allows a merge. At 0 only perfect rectangles join; raise toward 180 for angled pairs. |
| Max Shape Angle | 0 | Tolerance for how far the merged quad can bend from flat. Raise it when joining curved, non-coplanar triangles. |
| Topology Influence | 0 | Prioritizes merges that keep surrounding edge flow even. Values from 100 to 130 with Max Angle at 180 give the most uniform results on organic meshes. |
| Compare UVs | Off | Only merges triangles that are adjacent in the same UV island, protecting your texture layout. |
| Compare Sharp | Off | Refuses to merge across a marked sharp edge. |
| Compare Materials | Off | Refuses to merge triangles that carry different materials. |
| Deselect Joined | Off | Deselects every triangle that successfully merged so the leftovers stay selected and easy to spot. |
Alt+J merges the triangle pairs that share clean edges; leftover faces mark where a manual fix is needed.
Blender only merges triangles that share a real edge and that form a convex quad when joined. That safety check is why the operator sometimes leaves faces behind. When triangles refuse to merge, work down this checklist in order.
- Merge by Distance first. Duplicate vertices from a mesh cleanup or a boolean make edges look shared when they are not. Select all, press M, and choose Merge by Distance before retrying.
- Raise Max Angle. Triangles on curved surfaces sit at an angle to each other. Set Max Angle to 180 in the redo panel so angled pairs qualify.
- Turn off the Compare toggles. Sharp edges, material boundaries, or separate UV islands block merges on purpose. Disable Compare Sharp, Compare Materials, and Compare UVs when you are cleaning a raw mesh before texturing.
- Match by hand when the count is odd. A patch with an odd number of triangles cannot fully resolve into quads. Select the leftover pairs, dissolve the shared edge, and rebuild the last faces by hand.
This operator is the standard answer because it preserves the original surface almost exactly, and the official Blender manual documents every merge option and its effect on the output. It is the reverse of Triangulate Faces, so any mesh that was split into triangles cleanly tends to convert back cleanly. Imported game assets are a common case: a sculpt or CAD export often arrives fully triangulated. If you start from an FBX that came in as triangles, the import steps in importing FBX files into Blender keep the topology manageable before you run Alt+J.
Method 2: Rebuild Topology With a Quad Remesher in Blender
Alt+J only pairs up triangles that already sit next to each other. A densely triangulated sculpt, or a mesh whose triangles zigzag across the surface, has few clean pairs to work with. For those models you stop merging and start rebuilding, and a quad remesher lays down a fresh, even quad grid over the volume.
Blender’s built-in remesh is voxel based and outputs a uniform-density mesh that is not guaranteed to be clean quads. For actual quad output you want a dedicated quad remesher. Two reliable routes exist inside Blender:
- Install the free QRemeshify extension from Edit, Preferences, Get Extensions. It is purpose-built for quad remeshing and runs on Blender 4.2 and newer.
- Use a commercial quad remesher such as Quad Remesher, which is available as a Blender add-on and is widely used on game assets.
Whichever remesher you pick, the workflow is the same. Duplicate the mesh so the original stays untouched, select the copy, run the remesher, and set a target polygon count or edge length. The remesher generates an all-quad cage that follows the silhouette, then you use the result as the base for detailing. The tradeoff is real: remeshing approximates the volume, so fine details that were modeled as geometry can wash out. Keep dense detail in a normal map or keep the sculpt as a reference layer underneath.
Quad remeshing is the best method for high-poly sculpts, dense photogrammetry output, and assets that need a predictable base cage for fixing bad topology in AI 3D models with Blender. It trades a little shape fidelity for uniform, animation-ready flow in seconds.
Method 3: Use the Quadify Mesh Modifier in 3ds Max
3ds Max users get a dedicated, non-destructive converter called Quadify Mesh. Unlike a manual tool, Quadify Mesh runs as a modifier, which means you can stack it, tweak it, and collapse it when the result is correct.
To convert triangles to quads in 3ds Max:
- Select the object and open the Modify panel.
- Add Quadify Mesh from the modifier list.
- Set Quad Size, which controls the target size of each output quad in scene units. Smaller values preserve more detail and produce more quads.
- Adjust the value, watch the viewport update live, then right-click the modifier and Collapse To when the density looks right.
Quadify Mesh is ideal for hard-surface and CAD-style geometry where the quad grid should stay even and the silhouette must not move. Because it is a modifier, it stays reversible until you collapse it, which is a real advantage when you are iterating on a converted asset. Max users who only need this once in a while do not need a separate retopology tool for triangle-heavy imports.
Method 4: Merge and Retopologize in ZBrush (Tri2Quad and ZRemesher)
ZBrush approaches the problem from two sides. For lightly triangulated imports it can merge triangles into quads during import, and for heavy sculpts it rebuilds topology with ZRemesher, its automatic quad retopology engine.
First, Tri2Quad at import. ZBrush reads OBJ and other mesh files through Tool, Import, and the import dialog exposes a Tri2Quad parameter. Set Tri2Quad to 90, its highest value, and ZBrush merges adjacent triangles into quads as the file loads. For a mesh that was triangulated only lightly, this single setting can produce a quad-dominant result before any other work.
For a dense sculpt that import merging cannot tame, use ZRemesher:
- With the subtool selected, open the Geometry palette and click ZRemesher.
- Set Target Polygons Count to the density your final asset needs, from a low-poly game cage to a dense hero mesh.
- Enable Adaptive Size so smaller features get denser quads than flat areas.
- Run it, then keep the original subtool hidden underneath so ZRemesher can snap to its silhouette.
ZRemesher output is quad-dominant and flow-aware, which makes it a strong fit for organic characters and creatures. It reads curvature, so it tends to place quads where a human retopologist would. The catch is that ZRemesher targets volume and flow, not exact polygon budgets, so final cleanup in a manual tool is still common for animation rigs.
Method 5: Redraw Topology by Hand With Quad Draw in Maya
Every automatic method above is a compromise between speed and control. When the asset is a hero character, a facial rig, or anything where edge flow decides deformation quality, you redraw the topology yourself. Maya’s Quad Draw is the standard tool for this manual retopology pass.
To convert triangles to quads by hand in Maya:
- Select the triangulated mesh and open Mesh Tools, Quad Draw.
- Hover the cursor over the surface and click to drop a vertex. Quad Draw snaps each new point to the mesh beneath it.
- Place four vertices around a region, then click the center of the quad to fill it. Maya highlights fillable regions so you know where a valid quad can close.
- Follow the existing contours and place edge loops where the model will bend, such as around eyes, lips, and joints.
- Work from dense to coarse: rough in the main loops first, then fill flat regions, and let Maya shade the finished quad surface.
Manual retopology is the slowest method and the highest quality one. It is also where the discipline of edge flow matters most, which is why animation studios reserve it for the meshes that deform the hardest. You are not converting triangles so much as rebuilding the model correctly over them.
Which Conversion Method Should You Use?
The right way to convert triangles to quads is decided by where the mesh came from and what it has to do next. Use the matrix below as a starting point.
| Method | Best for | Effort | Result quality |
|---|---|---|---|
| Blender Alt+J operator | Meshes already close to quad, clean imports | Seconds | High, silhouette preserved |
| Blender quad remesher | Dense sculpts, photogrammetry, even cages | Minutes | Good, uniform flow, some detail loss |
| 3ds Max Quadify Mesh | Hard-surface and CAD geometry | Minutes | High, non-destructive until collapse |
| ZBrush Tri2Quad and ZRemesher | Organic characters and creatures | Minutes | High, flow-aware quad-dominant output |
| Maya Quad Draw | Hero assets, facial rigs, exact edge flow | Hours | Highest, full control |
Decision rule for triangle conversion
- 🔹 Mesh mostly clean already: use Blender Alt+J first.
- 🔹 Dense sculpt or scan: quad remesh it in Blender or ZBrush.
- 🔹 Hard-surface CAD part: Quadify Mesh in 3ds Max.
- 🔹 Hero asset that must deform perfectly: redraw it in Maya Quad Draw.
The deeper lesson in the table is that automatic conversion works best when you do not need it much. A mesh generated with sensible topology converts in seconds with Alt+J. A triangle soup takes a remesher, or an afternoon of Quad Draw, to become usable.
Stop Retriangulating. Start With Quad Topology.
Choose Quad or Triangle topology before generation so animation-ready meshes come out ready, not triangulated.
Generate a Quad-Topology Model
Free credits weekly on signup. Generate from a text prompt or a reference image.
Where Neural4D Fits: Generate Quad Topology From the Start
Every method so far fixes triangles that already exist. The more efficient answer is to never create them in the first place, and that is where AI generation changes the workflow. Many AI generators export dense triangle meshes that need a cleanup stage before they can animate. Neural4D treats topology as a generation parameter instead.
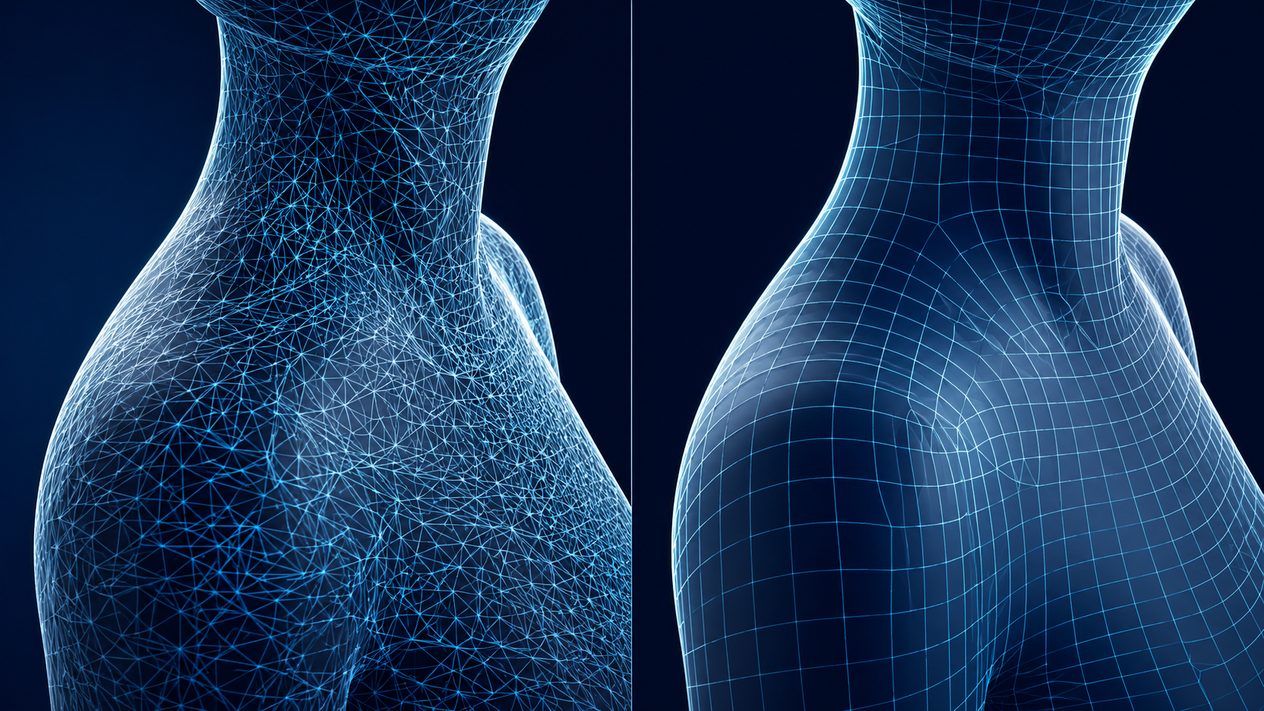
On the text to 3D and image to 3D features, you select Quad or Triangle topology before clicking Generate, with quad polycounts from 1,000 to 100,000. Choose Quad and a character or product meant for animation comes out as a quad mesh ready for subdivision and rigging, with no conversion pass in Blender or Maya afterward. The geometry is watertight by construction, which also removes the usual hole-patching step.
Quad-dominant wireframe output on a Neural4D-generated model, ready for subdivision without a conversion pass.
If you already generated a Neural4D model in Triangle topology, Neural4D AI Retopo re-topologizes it into clean quads with a single operation instead of a manual redraw: open the asset on the generation page, click Remesh, and choose Quad. The scope rule matters here: Neural4D generation and AI Retopo operate on models created inside Neural4D, so a triangle mesh you imported from a third-party tool is still handled by Methods 1 through 5 above.
The mental model that keeps all of this straight is prevention versus repair. For geometry you create fresh, generation-time Quad topology makes the problem disappear. For triangle meshes that already exist, the five methods in this guide are your repair kit, and automatic methods handle the large majority of cases.
Already Have a Neural4D Triangle Model?
Convert it to clean, animation-ready quads with AI Retopo instead of an hour of manual redrawing.
Quad retopology works on models you generated inside Neural4D. Triangle retopology also available.
Share Your Creation
Tag @Neural4D and use #Neural4D to be featured on our channel.
Common Questions on Converting Triangles to Quads
The outer shape stays the same because merging two adjacent triangles removes only the internal edge they share, and the border vertices do not move. Blender protects the shape by refusing joins that would create a concave or degenerate quad, which is exactly why the Max Angle and Max Shape Angle options exist. The exception is remeshing, which approximates the volume and can smooth away small details, so always remesh a duplicate.
Yes, by one face for every successful merge, because two triangles become a single quad. A fully triangulated mesh can drop to roughly half its face count when every pair joins. The vertex count stays the same, since the merge dissolves an edge rather than a point. The visible count only matters in the editor; renderers and engines retriangulate quads internally, so the real draw cost barely changes.
No file conversion can do it, and that surprises most people. OBJ, STL, GLB, and FBX are storage formats; a file saved as triangles contains only triangles, and no importer can recover quads that were removed by an earlier triangulation step. Converting to quads is always a modeling operation, done with Alt+J, a remesher, Quadify Mesh, ZRemesher, or Quad Draw after import. Keep a quad master file while you work and export triangles only for final delivery.
Not directly. Unity, Unreal, and Godot triangulate every mesh on import because GPUs render triangles and nothing else. What matters is where those triangles land: long thin sliver triangles, or triangles crossing a deformation zone, produce shading artifacts and bad deformation in real time. Author in quads so the engine’s own triangulation is even, and keep the quad file as the source of truth for every delivery format.
It depends on the generator. Many AI generators export dense triangle meshes that need a cleanup or retopology stage before use. Some give you control at generation time: Neural4D offers a Quad and Triangle topology choice on text to 3D and image to 3D, so an asset meant for animation can be generated in quads and skip the conversion step entirely. The caveat from Method 5 still applies to third-party triangle files you bring in yourself.
Get Clean Quad Topology Without the Manual Cleanup
Convert triangles to quads with the method that matches the mesh: Alt+J for clean imports, a quad remesher for dense sculpts, Quadify Mesh for hard-surface parts, ZRemesher for organic characters, and Quad Draw for hero assets that must deform perfectly. Each one is faster and more reliable when the source geometry is already sane, which is the real takeaway.
Triangles are not the enemy. Disorganized triangle topology is, because it forces hours of cleanup onto a step that should be a parameter. The cleanest workflow makes topology a decision you make up front: choose Quad at generation in Neural4D, keep the quad file as your master, and export triangles only for the engine. When a legacy triangle mesh still lands on your desk, the five methods above are your complete repair kit.