How to Make a Character Reference Sheet With AI
Quick Summary
- A character reference sheet shows a character’s views, expressions, colors, and identifying details in one image.
- To make a character reference sheet with AI, describe the character and the panel layout, then generate the complete sheet in a single landscape image.
- Check the views, expressions, colors, and labels before saving the result as a reference.
- N4D’s Image Generation workspace puts several image models in one place and accepts a text prompt with an optional reference image.
To make a character reference sheet with AI, describe your character and the layout you need, generate the complete sheet, then check its views, expressions, colors, and labels before saving it. You can request several views and supporting details in one image. Separate generations and manual assembly are optional if the first result needs more work.
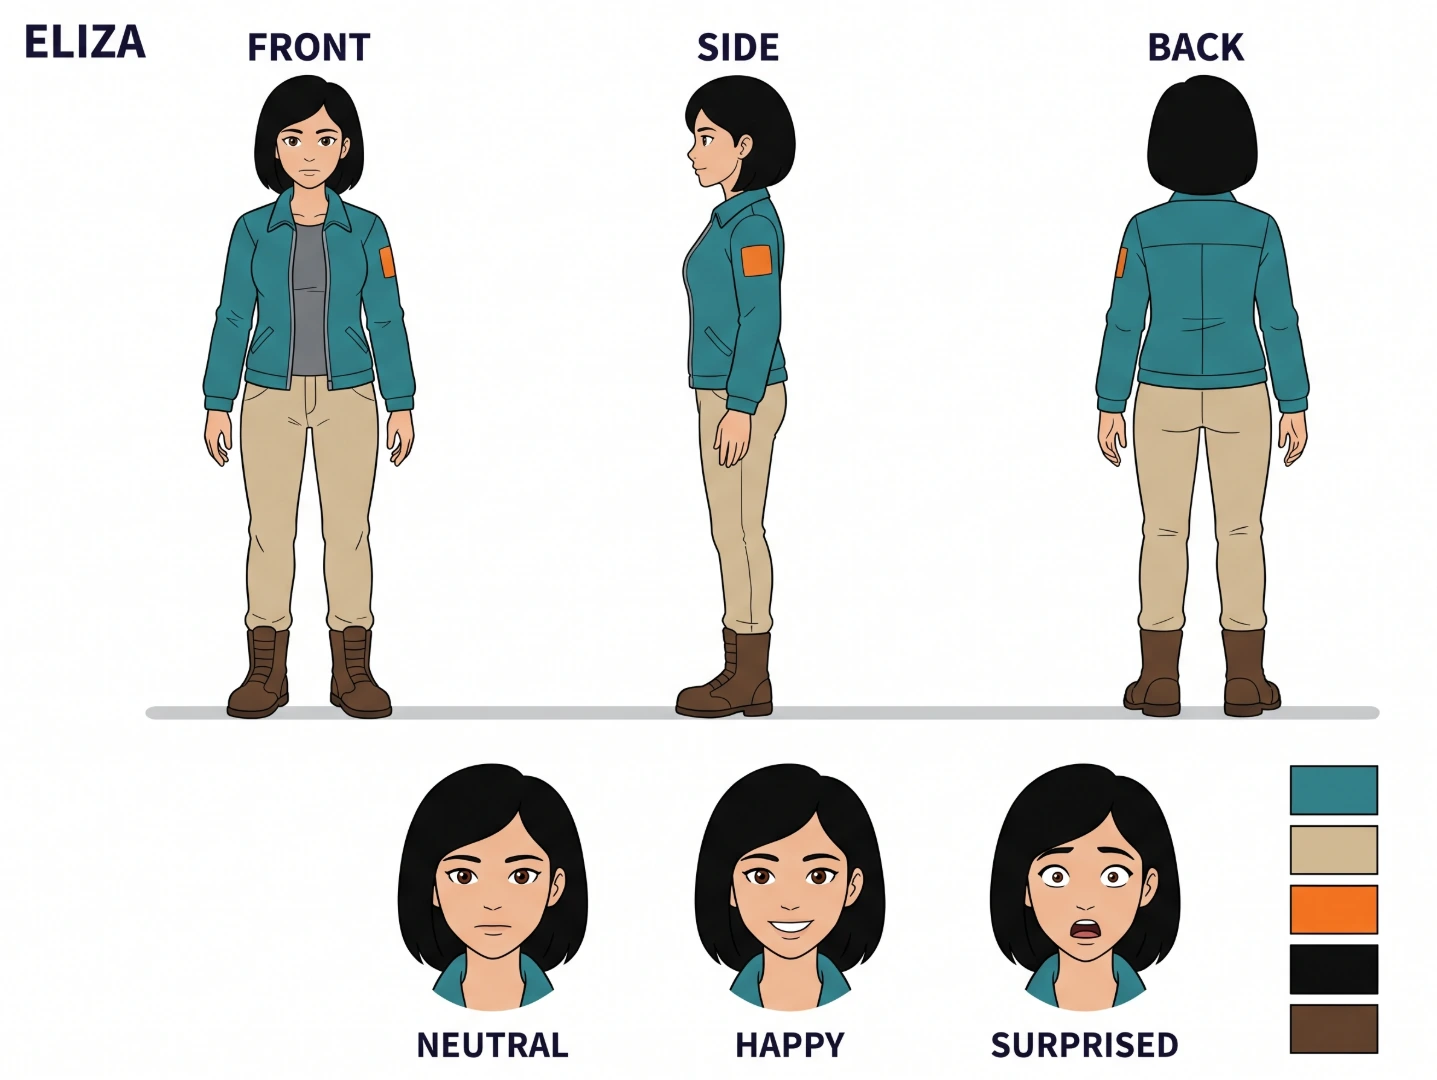
The example below was generated by a user in N4D’s multi-model Image Generation workspace, using Nano Pro on November 5, 2026. This sheet came from one Nano Pro generation using the exact prompt below, with no edits afterward. It is one successful example, so review your own result before sharing it as a design reference.
How to Make a Character Reference Sheet: What to Include
A character reference sheet brings the visual decisions for a character onto one page. It helps an artist or collaborator see the design without reconstructing it from a long description. An OC reference sheet serves the same purpose for an original character.
A character reference sheet is also called a model sheet, and a matching set of angle views is often called a turnaround. This guide uses character reference sheet throughout.
Choose the contents around what the recipient needs to draw or understand:
- Useful views: front, side, and back can explain clothing and silhouette. Add a three-quarter view when the angle matters. A portrait commission may need fewer views; a detailed outfit may need an extra close-up.
- Facial expressions: a small selection shows how the face changes while retaining its identifying features.
- A color palette: swatches make the main hair, clothing, and accent colors easy to find.
- Distinctive details: identify a scar, sleeve patch, hair part, or accessory whose position matters.
- Clear labels: identify views and any approved character name or design notes.
For this example, the deliverable is one static 2D image with three full-body views, three expressions, and five swatches. The sheet gives visual guidance. Precise production drawings may need further work on proportions and construction.
A pose sheet is a separate deliverable for action poses. Keep it out of this static reference sheet unless the recipient specifically needs it.
Step 1: Define the Character Before Generating Images
Decide which details must stay the same before writing the prompt. A compact design makes it easier to see whether the result follows your instructions.
Use this checklist for your own character:
- Face and hair: age group, eye color, haircut, and identifying facial features.
- Body and silhouette: build, proportions, and posture.
- Outfit: garment types, main colors, and footwear.
- Asymmetry: details found on only one side, described from the character’s perspective.
- Presentation: the views, expressions, background, and drawing style you need.
Our example uses an adult woman with a black bob, brown eyes, a teal jacket, beige pants, and brown boots. An orange patch belongs on her left sleeve only. That small detail makes the front and back views worth comparing: her left side appears on opposite sides of the page as she turns.
Keep a longer design note outside the prompt field if needed. When space is limited, prioritize the details that would make the character wrong if they changed. Add narrative background only when it affects the visible design.
Step 2: Write a Reference Sheet Prompt Under 500 Characters
The N4D prompt field used for this example has a 500-character limit. The following prompt contains 463 characters, including spaces and punctuation. Copy it to use the same character description and layout.
Create ONE 2D character reference sheet on white. Same adult woman throughout: black bob, brown eyes, teal jacket, beige pants, brown boots, orange patch on LEFT sleeve only. Top: full-body FRONT, SIDE and BACK views, equal scale, heads and feet aligned. Bottom: neutral, happy and surprised portraits plus five color swatches. Keep face, proportions, outfit and colors consistent. Flat colors, clean lines. No props. Label FRONT, SIDE, BACK. One landscape image.The prompt uses its space for four jobs: defining the character, arranging the panels, identifying what should stay consistent, and setting a simple visual style. “One landscape image” asks for the whole layout in a single output. “Equal scale, heads and feet aligned” gives you a visible alignment requirement to check afterward.
To adapt it, replace the character description while retaining the layout instructions you need. Remove an expression or simplify clothing details if the revised text exceeds the limit. Count the full prompt again after making changes.
If the character already has an approved name, specify it within the limit. Otherwise, inspect any name the model adds before treating it as part of the design. In this result, ELIZA was an unrequested addition.
Step 3: Generate the Complete Sheet in N4D
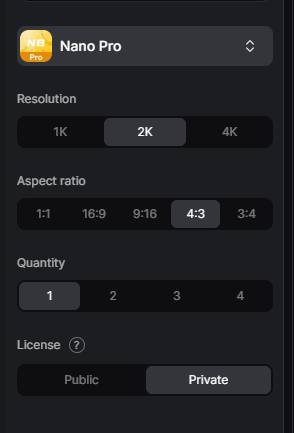
N4D provides several image models in one workspace through its AI image generator. At the time of this walkthrough, its model picker showed Image 2, Nano Pro, Seedream 4.5, Flux 2 Pro (labeled Fx 2 Pro in the picker), and Nano 2 Lite. You can try another available model without moving your character brief to another platform. This example uses Nano Pro; the other models were not tested for this sheet.
- Sign in and open N4D Image Generation. Make sure you are using the Image mode.
- Enter the prompt above and select Nano Pro. If you already have a character drawing, you can upload it as an optional reference alongside your text. A written prompt is still required.
- Choose 2K resolution, landscape 4:3, and Quantity 1 to match this example.
- Review the available visibility choice and the Credits shown for your task, then select Generate.
- Inspect the completed image before deciding whether to keep it or generate again.
When using an existing drawing as a reference, compare the generated face, outfit, and proportions against that drawing as well as your written brief.
Resolution and aspect ratio options vary by model. Use the controls shown for the model you select.
Private visibility is available to paid subscribers. Check visibility before generating if the design should stay out of the Community. For basic interface guidance, see the N4D Image Generation guide.
One generation produced this complete sheet with the supplied prompt and no postprocessing. A different character or prompt can need another attempt.
Step 4: Check the Views, Expressions, Colors, and Labels
A convincing layout is the start of the review. Compare the panels against the design note from Step 1, especially the details that would matter to someone drawing the character again.
| Check | What the example shows | What to inspect in yours |
|---|---|---|
| Views and framing | Distinct front, side, and back views, with heads and boots visible. | Correct angles, complete bodies, and comparable scale and alignment. |
| Character and outfit | The black bob, teal jacket, beige pants, and brown boots recur across the sheet. | Face shape, silhouette, garment construction, and important details. |
| Left-side patch | The orange patch is on the viewer’s right in front view and left in back view. | Details remain on the character’s intended side as the view changes. |
| Expressions | Neutral, happy, and surprised portraits are visibly different. | The emotion changes while the face and haircut remain recognizable. |
| Palette | Five swatches accompany the design. | Swatches represent the intended colors and agree with the artwork. |
| Text | View and expression labels are readable; ELIZA was added without being requested. | Correct labels and spelling, with no unwanted names or notes. |
Look beyond matching colors. Compare the jacket hem, sleeve shape, boot height, and hair length between views. A sheet can look consistent at a glance while leaving construction details unclear.
Use the sheet as a creative visual reference. If a collaborator needs precise proportions or a geometrically exact turnaround, check the sheet against their production requirements.
Step 5: Regenerate or Edit the Sheet if Needed
If the result meets your purpose, keep it. You do not need to generate each view separately or move the artwork into a layout editor simply because it is a reference sheet.
When something is wrong, make the next change address that issue:
- Wrong or missing view: simplify the requested layout and make the required views explicit.
- Inconsistent outfit or side detail: clarify the affected feature and reduce competing details in the prompt.
- Unwanted name: specify the approved name or request no character name, staying within the character limit.
- Unsuitable style: adjust the style description, or try another available image model in N4D and repeat the review.
A changed prompt or model can also change details you liked, so compare the entire new sheet before replacing your earlier version.
For precise manual corrections after download, use an external image editor. Cropping individual views or arranging separate images in an external editor is also optional. If exact colors matter, confirm the palette values separately; generated swatches do not provide verified HEX values by themselves.
Step 6: Download and Use Your Reference Sheet
Once the sheet passes your checks, download the image from N4D as a PNG. Keep the prompt and settings with it so you can refer to the design decisions later.
When you generate later expressions, outfits, or alternate views, attach the approved sheet as a reference image and state which details must stay fixed. Review the new result against the sheet before using it.
Before handing it to an illustrator or collaborator, confirm:
- The required views and important details are visible.
- The labels and character name are approved.
- The colors and side-specific features match your intended design.
- The recipient knows which details are final and which remain open to interpretation.
- The recipient needs the whole sheet, or you have actually prepared separate view files.
A single PNG contains the combined artwork. If you need a front view, back view, or expression as its own file, prepare those files separately. The sheet remains a 2D reference rather than a finished 3D character.
If your next task is choosing a video tool for a recurring character, see our guide to AI video tools for consistent characters. Keep the approved reference sheet available for that separate workflow.