What is PBR Texturing? The Technical Guide to Physically Based Rendering
If you have ever exported a 3D model that looked perfect in your modeling viewport but resembled cheap plastic once dropped into a game engine, you already know the frustration of broken lighting. For years, 3D artists spent massive portions of their pipeline “faking” light by painting highlights and ambient occlusion directly into their texture files. PBR Texturing completely dismantled that old workflow.
Instead of guessing how a material should look, PBR uses mathematical formulas to dictate how a surface absorbs, reflects, and scatters light. Whether you are building an indie game in Unity or setting up a high-fidelity e-commerce viewer for Apple Vision Pro, understanding physically based materials is the only way to achieve a professional, production-ready result without spending hours tweaking node setups.
- Part 1: Understanding the Energy Conservation Principle in PBR
- Part 2: How Does PBR Texturing Work? The Core Map Stack
- Part 3: Traditional Node Workflows vs. AI Automation
- Part 4: Scaling Production with Neural4D Textrix
- FAQ: Troubleshooting Your PBR Pipeline
- Part 5: Conclusion – Standardize Your Asset Pipeline
Part 1: Understanding the Energy Conservation Principle in PBR
PBR is not a specific software feature; it is a standardized methodology adopted by the entire industry. To grasp why it works, you must understand two foundational concepts of optical physics that govern modern rendering engines.
The first is Energy Conservation. This rule states that a surface can never reflect more light than hits it. In legacy workflows, artists often pushed specular highlights too high, causing assets to “glow” unnaturally under bright directional lights. PBR engines automatically balance diffuse reflection (color) and specular reflection (gloss). If a surface is highly reflective, its base color naturally darkens to compensate, keeping the math physically accurate.
The second concept is the Fresnel Effect. Think about looking down into a clear lake. Looking straight down, you see through the water. But if you look across the lake at a shallow angle, the surface becomes highly reflective, mirroring the sky. PBR materials automatically calculate this shifting reflection intensity based on the camera angle, adding immediate, effortless realism to AI 3D game assets and architectural renders.
- Universal Consistency: A PBR asset generated by Neural4D reacts to light identically in Unreal Engine 5, Blender, or a WebGL browser.
- Dynamic Environment Ready: Zero baked-in shadows means your model looks correct whether it is lit by a midday sun or a neon sign.
- Material Definition: The engine definitively knows the difference between a steel beam and a wooden plank based purely on the data maps provided.
Part 2: How Does PBR Texturing Work? The Core Map Stack
To communicate physics to a rendering engine, PBR breaks materials down into specialized 2D image channels. You need a complete stack to get the correct output.
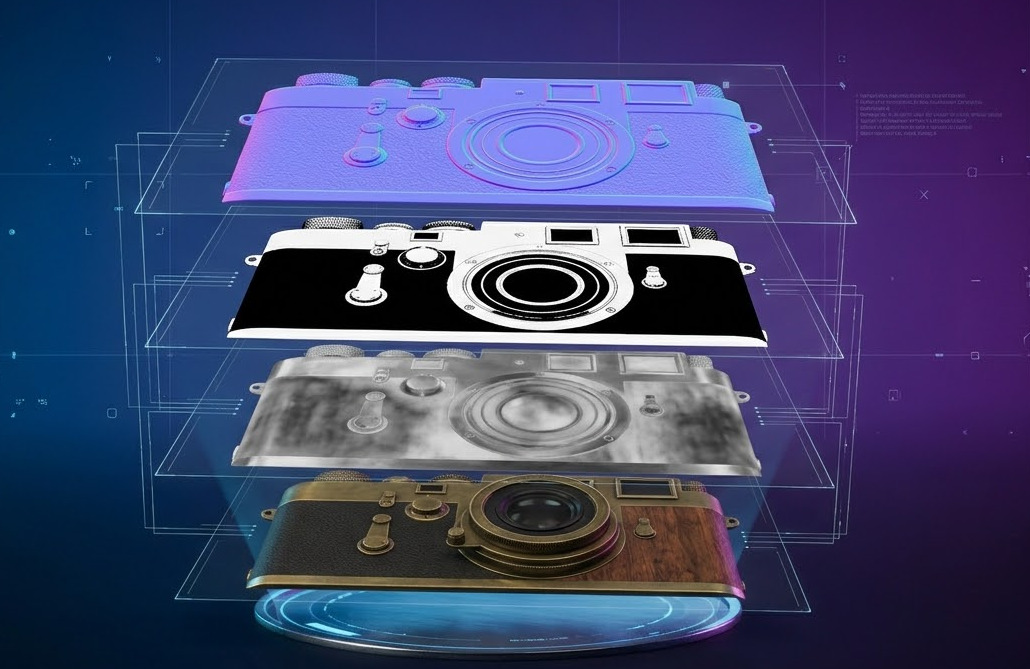
Albedo: The Intrinsic Color
The Albedo map (often called Base Color) represents the raw color of the object, completely free from shadows or highlights. In a strict PBR workflow, this image looks extremely flat. If you bake ambient occlusion into this map, you will ruin the energy conservation math in the engine.
Roughness Map: Micro-Surface Scattering
This grayscale image controls how light scatters across microscopic bumps on the model’s surface. A value of 0 (black) creates a perfectly smooth, mirror-like finish. A value of 1 (white) creates a completely matte, rough surface like unpolished concrete. The Roughness map is where most of a material’s “story” lives—smudges, fingerprints, and wear are painted here.
Metallic Map: The Conductor Mask
The Metallic map is usually a binary mask. Pure white pixels tell the engine the surface is a metal (conductor), while pure black pixels indicate a dielectric (plastic, wood, cloth). Metals do not have a diffuse color; their visual identity comes entirely from reflected light, which the engine calculates based on this mask.
Normal Map: Geometric Illusion
Normal maps allow you to fake high-density geometry on a low-poly mesh. Using RGB values to represent X, Y, and Z coordinates, it tells the light how to bend around simulated bumps, scratches, and crevices. This is crucial for optimizing production-ready 3D assets without tanking your frame rate.
Generate PBR-Ready Assets Fast
Skip the tedious UV mapping and node wrangling. Upload an image and let Neural4D extract the full texture stack for your engine.
Used by technical artists to cut material authoring time from hours to minutes.
Part 3: Traditional Node Workflows vs. AI Automation
Creating these maps manually is a massive bottleneck in 3D production. Let’s compare the traditional pipeline against modern automated solutions.
In traditional software like Blender or Maya, artists often rely on complex node trees to build materials. You start with a base mesh, unwrap the UVs, and then jump into software like Substance Painter. From there, you manually paint the Roughness variations and bake out the Normal maps from a high-poly sculpt. For a single hero prop, this process easily consumes 4 to 8 hours.
Engines like V-Ray or KeyShot offer powerful rendering, but they still require you to feed them perfect, manually adjusted map parameters to get a photorealistic result. If you are a solo developer or an e-commerce brand trying to digitize hundreds of products, this manual workflow does not scale.
Modern AI 3D generators flip this paradigm. By analyzing a single input image, the algorithm understands the geometric volume and estimates the material properties automatically, generating the Albedo, Normal, and Roughness maps simultaneously with the mesh generation.
Part 4: Scaling Production with Neural4D Textrix
The biggest challenge in generating 3D models from 2D images is “baked-in lighting.” If you take a photo of a chair, the room’s lighting and shadows are embedded in the pixels. If an AI simply projects that photo onto a 3D mesh, the asset is useless in a game engine because it will carry those dead shadows forever.
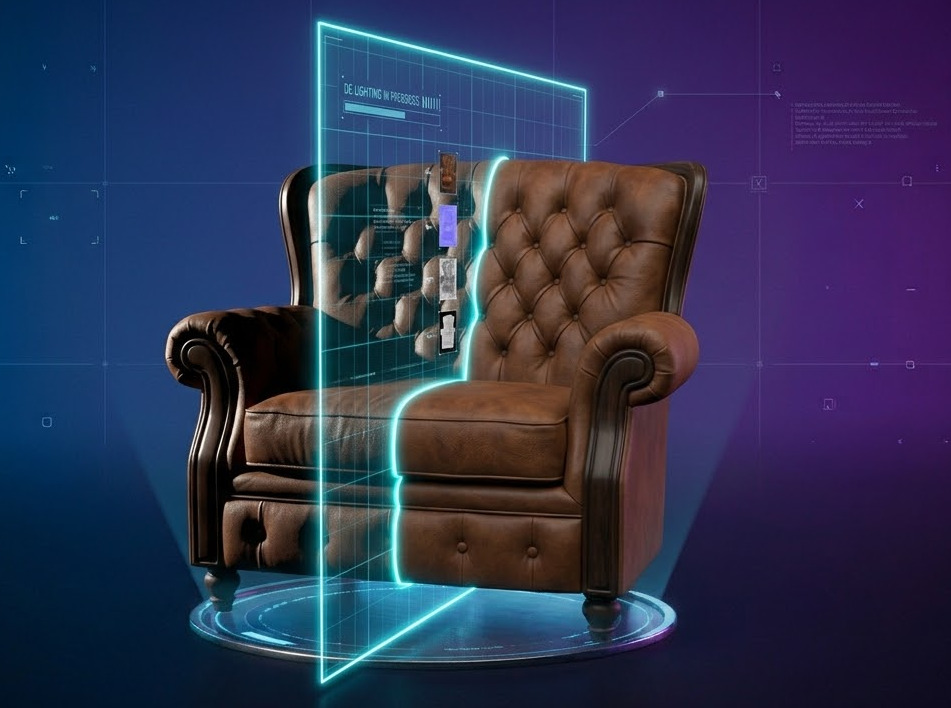
Neural4D addresses this specifically through its Textrix technology. The system actively de-lights the input image. It separates the environmental lighting from the intrinsic base color of the object, outputting a pure, flat Albedo map.
Furthermore, it analyzes the surface context to generate corresponding Roughness and Normal maps. This means when you export a .glb or .fbx file from Neural4D, it drops directly into your Unity or Unreal pipeline with the materials reacting correctly to your scene’s directional lights. For enterprise teams needing mass asset conversion, this capability is also accessible via the Neural4D API, allowing you to bypass manual texturing entirely.
Automate Your Material Pipeline
Don’t let manual texturing slow down your game development or product catalog digitization.
Trusted by XR developers for clean, unlit texture extraction.
FAQ: Troubleshooting Your PBR Pipeline
Why does my texture look completely black or metallic in my engine?
This is the most common error when importing assets. You likely have the Metallic map routed into the wrong node, or the engine is reading your sRGB Albedo map as linear data. Ensure your Albedo is set to sRGB, while your Roughness, Metallic, and Normal maps are explicitly set to Linear or “Non-Color Data.”
Can I use PBR maps for 3D printing?
3D printers only read geometry, not light data. Therefore, Albedo, Roughness, and Metallic maps are ignored by slicing software. However, the clean topology required to support good PBR maps ensures that models generated by Neural4D are generally watertight and structurally sound for physical STL exports.
What is the difference between Specular and Roughness workflows?
Metal/Roughness is the modern standard used by Unreal, Unity, and most WebGL viewers because it uses less VRAM. Specular/Glossiness is an older workflow that gives artists slightly more control over the exact color of reflections but requires heavier RGB maps. Stick to Metal/Roughness for all real-time applications.
Part 5: Conclusion – Standardize Your Asset Pipeline
The industry standard is clear. If your models do not respond accurately to dynamic lighting, they are obsolete. Adopting a strict methodology for PBR Texturing guarantees that your assets hold their visual fidelity across different platforms, lighting setups, and use cases. By leveraging automated de-lighting and map extraction, you can stop fighting node editors and focus entirely on assembling your environment.
Experience Production-Ready Texturing
Stop painting maps by hand. Upload your reference image and get engine-ready geometry and materials in minutes.
No credit card required for initial generations.