How to 3D Print a Replacement Part: Measure, Model, and Test
To 3D print a replacement part, start with the dimensions that control how it fits. Build a model, verify the exported file, and print a small sample before committing to the full part. This walkthrough uses a decorative cap for a nominal 20 × 20 mm square tube. We generated and measured the STL digitally. The printing and fit checks below are steps to follow on your own object.
You’ll need calipers, the original part or the mating surface, a slicer, and access to an FDM printer or a print service.
Step 1. Choose a Part to Replace
Search the manufacturer’s parts page, Printables, MakerWorld, or Thingiverse for an existing replacement. Verify the model number and mating dimensions before using a file. If an existing STL has mesh errors that prevent slicing, see how to repair the STL. When there’s no suitable file, a simple cover or trim piece is a practical first project. The example here is a slip-on cap that covers an exposed tube end on an indoor desk organizer. It has four side walls and a flat closed end. Its job is to cover the opening.
Other candidates include decorative furniture leg caps, cabinet knobs, and trim clips. Use this workflow for cosmetic and non-structural parts. Choose a manufacturer-approved replacement for anything that carries a load, maintains a water or air seal, operates at high temperatures, or protects the user. For a broader look at modeling options, see the guide to designing your own 3D prints.
Step 2. Measure What the Part Fits Over
For an outside-fitting cap, use calipers to measure the tube across both pairs of flat faces. Check at the mouth and again near the intended insertion depth. Keep the largest reading for each direction across the area the cap will cover. Look for burrs, corner geometry, seams, and nearby obstacles that could stop the cap. If you have an intact cap, use it to check the desired profile and depth.
For the digital example, assume a 20 × 20 mm tube with at least 5 mm of unobstructed length at the end. A cavity 20.4 mm wide and 20.4 mm high leaves 0.40 mm of nominal clearance across each axis, or 0.20 mm per side when centered. Use that as a sample design value. The Prusa modeling guide explains how geometry, orientation, calibration, print settings, and material affect the clearance a real print needs.
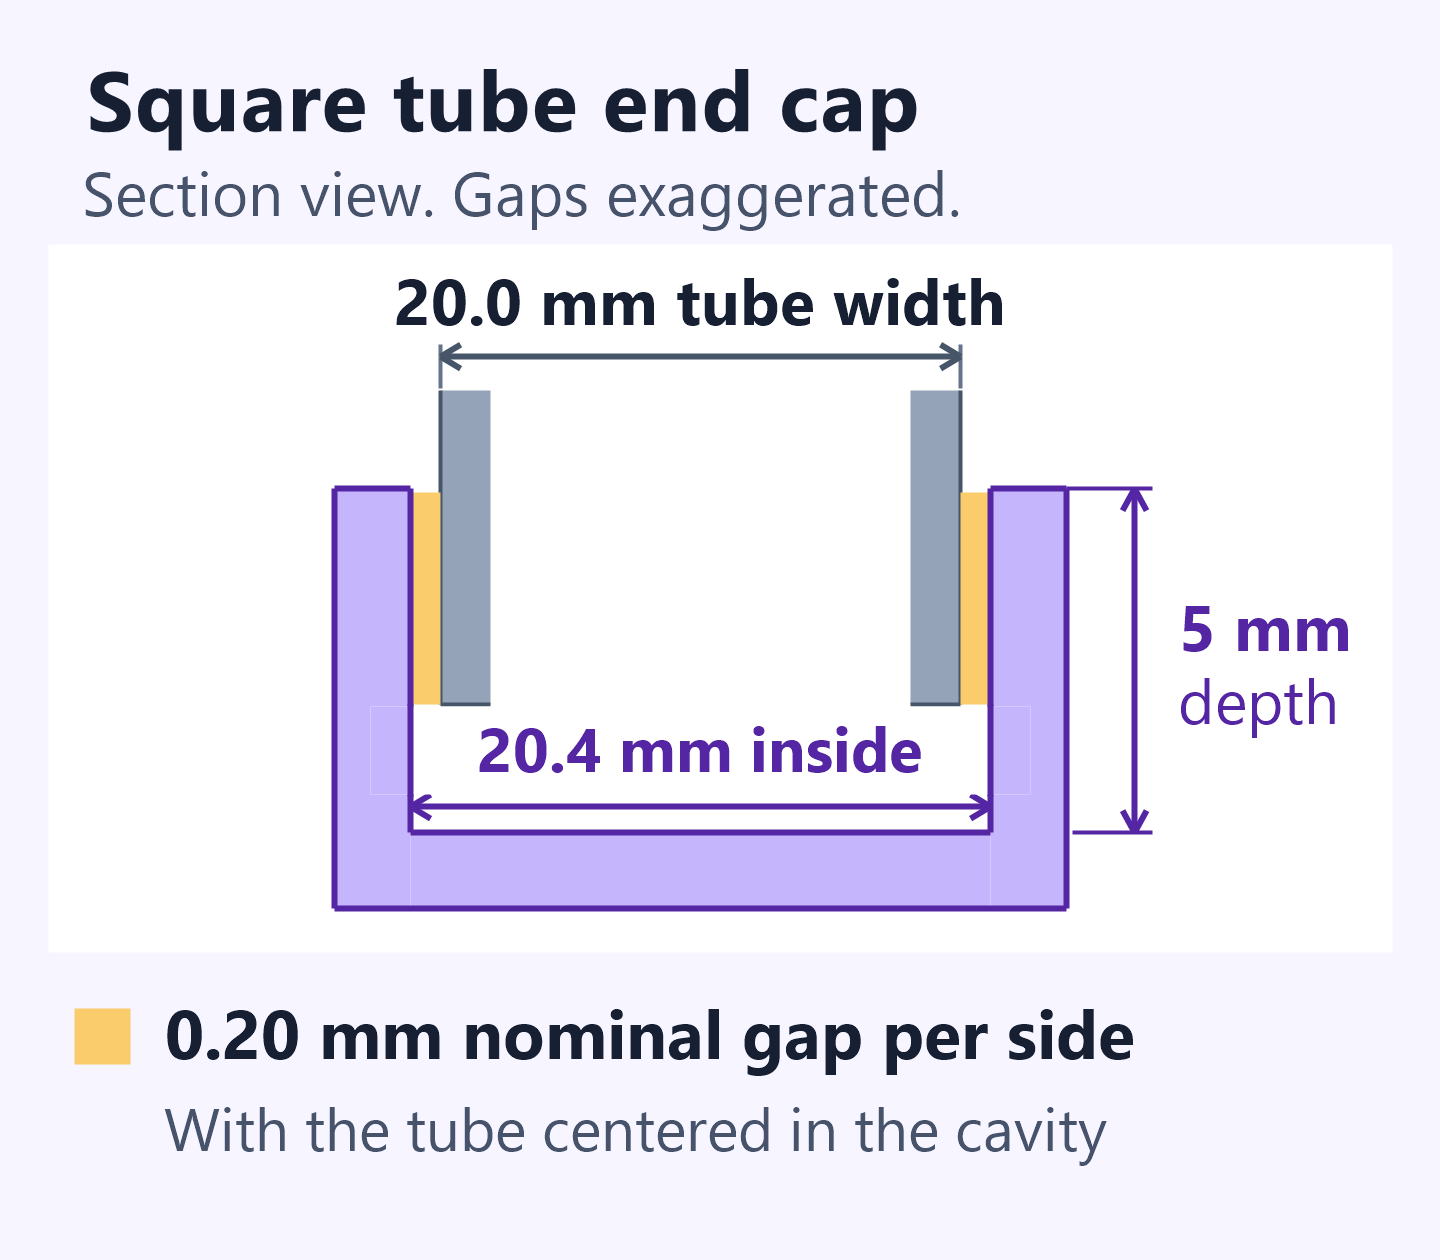
For your own cap, add the planned clearance on both sides to the measured outside width to get the cavity width. Repeat the calculation for the height using its own measurement. In this example, 20.0 + 0.20 + 0.20 = 20.4 mm on each axis.
Step 3. Build and Check the CAD Model in Coala
In N4D’s Coala workspace, select CAD and describe the cap from the tube’s dimensions. Specify the internal cavity first, then the walls and the closed end. The prompt below is the one used to generate the model in this example. Replace its dimensions with your own when modeling a real replacement.
Create a square end cap that slips over the outside of a 20 × 20 mm metal tube. Make one end open and the other flat and closed. The internal cavity must be 20.4 mm wide, 20.4 mm high, and 5 mm deep, measured from the opening to the inside face of the closed end. Use four straight side walls, each 1.6 mm thick, and a 2 mm thick closed end. Do not add ribs, tabs, or holes. Make the cavity width, height, and depth independently adjustable.
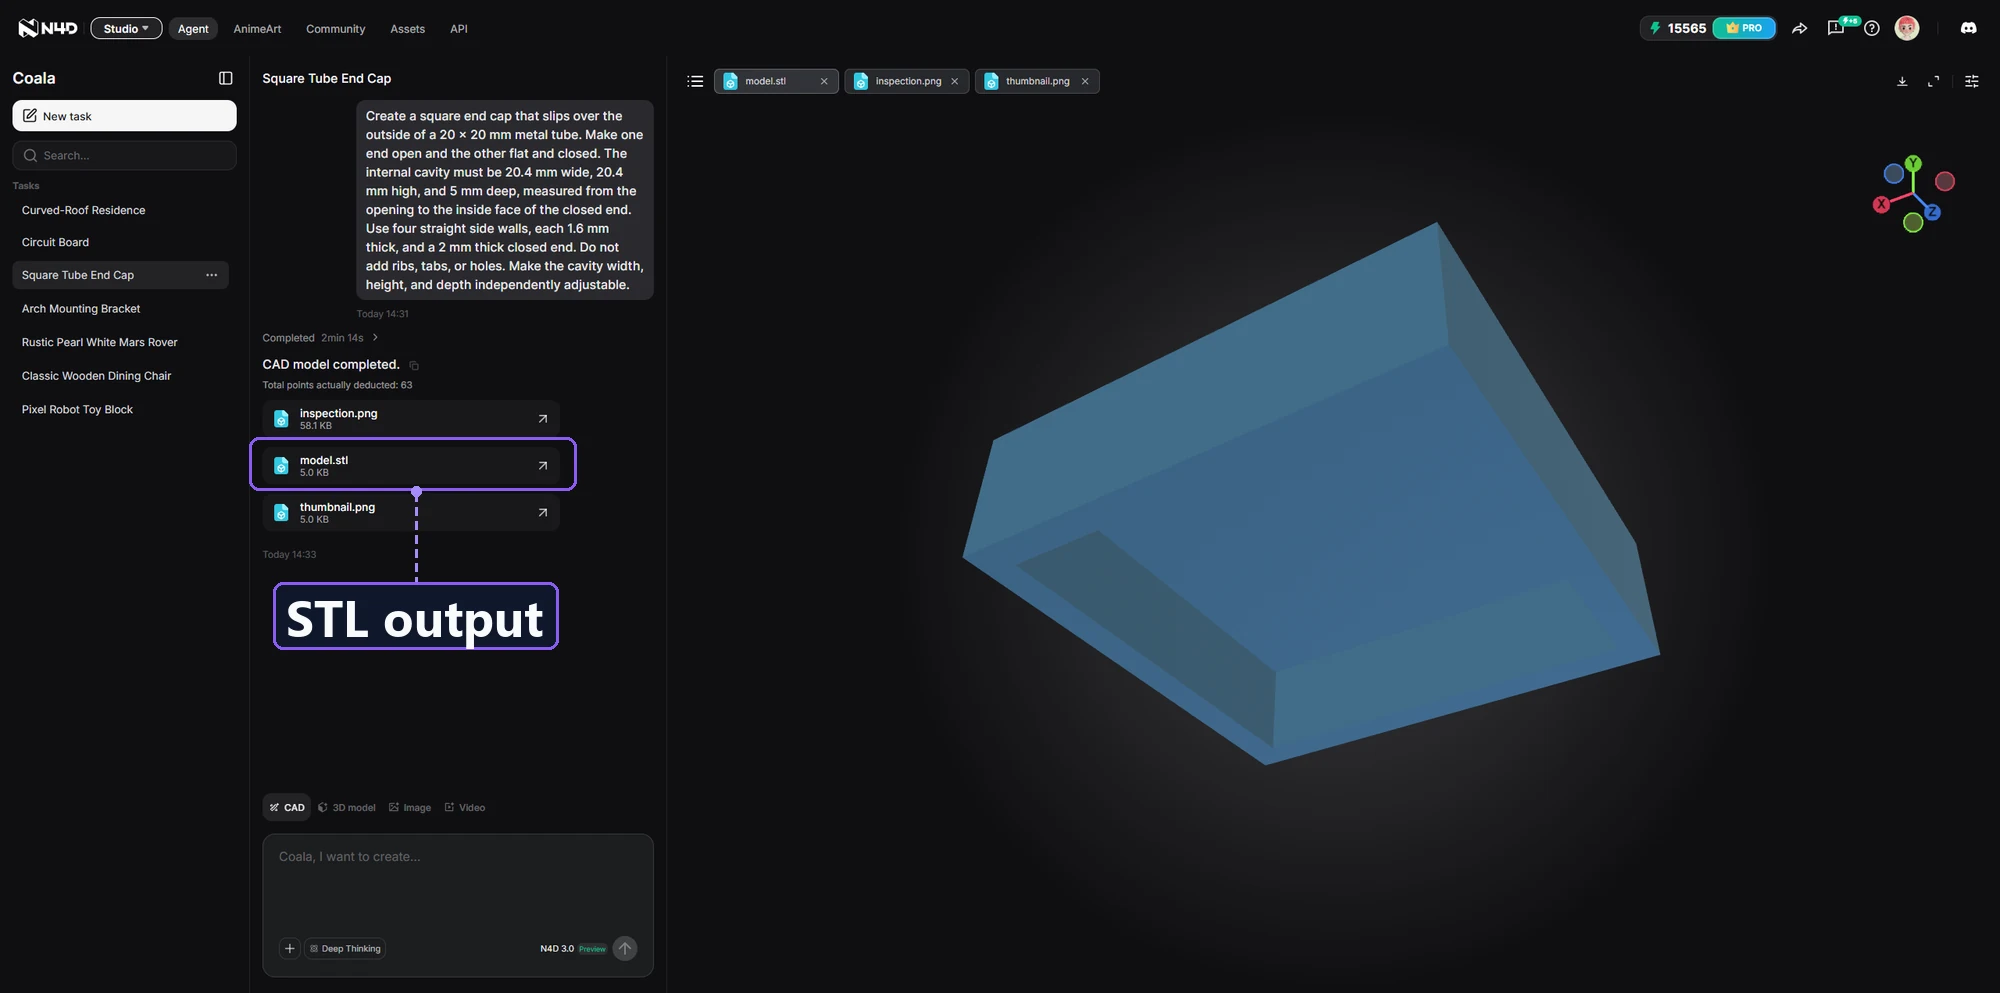
Check the model from the open end and download the STL. We checked the coordinates of the exported mesh against the requested dimensions. Its 28 triangles form a closed mesh surface around the material, including the walls and base of the open cavity. The STL stores triangle coordinates without a unit setting, so the numbers below use the millimeters specified in the prompt. Confirm that your slicer imports the file at that scale.
| Feature | Verified in the mesh |
|---|---|
| Internal width × height | 20.4 × 20.4 mm |
| Cavity depth | 5.0 mm |
| Side wall / closed end thickness | 1.6 / 2.0 mm |
| Overall width × height × depth | 23.6 × 23.6 × 7.0 mm |
Coala’s CAD feature guide describes adjusting model dimensions in its preview. For an edit, check which controls your task exposes. If the cavity dimension you need is unavailable as a separate control, specify the change in the prompt and recheck the resulting STL.
Step 4. Slice and Print a Fit Sample
Import the STL into your slicer and compare the overall dimensions with the model before changing anything. For this example, the three expected extents are 23.6, 23.6, and 7.0 mm. Depending on the orientation, the slicer may display the 7.0 mm extent on a different axis. Place the flat closed end against the build plate so the opening faces up. This keeps first-layer squish away from the mating opening. The four walls rise from a solid base and the cavity has no roof to bridge. Review the layer preview for continuous walls and an open cavity.
If your actual cap needs more depth, first print a short version with the same opening dimensions, wall thickness, material, and orientation. The example STL already has a 5 mm cavity and can serve as a short model for a tube sized to match the example. Keeping the print settings consistent helps you isolate what changed between samples. For a walkthrough of the slicer stage, see the N4D and ELEGOO printing guide.
Step 5. Test the Fit, Revise, and Print the Final Part
Let the sample cool, then measure the opening across both pairs of flat walls. Check at the mouth and again near the full insertion depth if your calipers can reach. Slide the cap onto the tube by hand. Note how far it goes, where it stops, and whether it stays put when lightly nudged. Compare the printed measurement with the CAD target before choosing what to change.
- It catches at a corner. Check whether a burr, a corner, or stray material on the print is the first point of contact. Fix that contact point before changing the whole opening.
- It binds along a flat face. Recheck the printed opening and the corresponding tube dimension. If the opening prints to size but lacks clearance, increase the affected inner dimension. If it printed undersized, investigate the print settings before compensating in CAD.
- It slides on but falls off easily. Reduce clearance on the loose axis in the next sample and keep the other settings constant.
Once the sample fits as intended, print the full cap and check it again. A deeper cap may hit a seam, taper, or obstacle that the short sample never reached. For this kind of decorative part, the final check is simple: it reaches the intended position by hand, clears adjacent surfaces, stays in place when lightly nudged, and comes off without forcing it. Save the STL and slicer settings that produced that result.
Common Questions About How to 3D Print a Replacement Part
Why do thin walls disappear after I slice the model?
First check the STL’s imported size and confirm the wall is present in the unsliced model. If it disappears only in the layer preview, compare the wall thickness with the extrusion width in your printer profile. In PrusaSlicer, try the Arachne perimeter generator or enable Detect thin walls if you use Classic. Re-slice and check for continuous extrusion paths. If the wall still drops out, thicken it in CAD while keeping the cavity dimensions fixed, then check the preview again. See Prusa’s guide to layers and perimeters.
Can I get a replacement part printed without owning a 3D printer?
Yes. Ask a local makerspace, library, or print service whether it accepts STL files. Some libraries publish their file requirements, such as Nashville Public Library. Send the short sample first and state the expected dimensions in millimeters so the operator can verify the scale. Ask what material and print orientation they can use and whether they can match those for the final part. Check the sample on your object before ordering the full version.
Conclusion
For a decorative end cap, start with the opening that has to fit. Coala can build the model from your dimensions and export an STL to check before you print. If you’re making a replacement for your own tube, print the short sample first. Use where it stops or feels loose to decide what to change, then test the full cap before putting it into use.