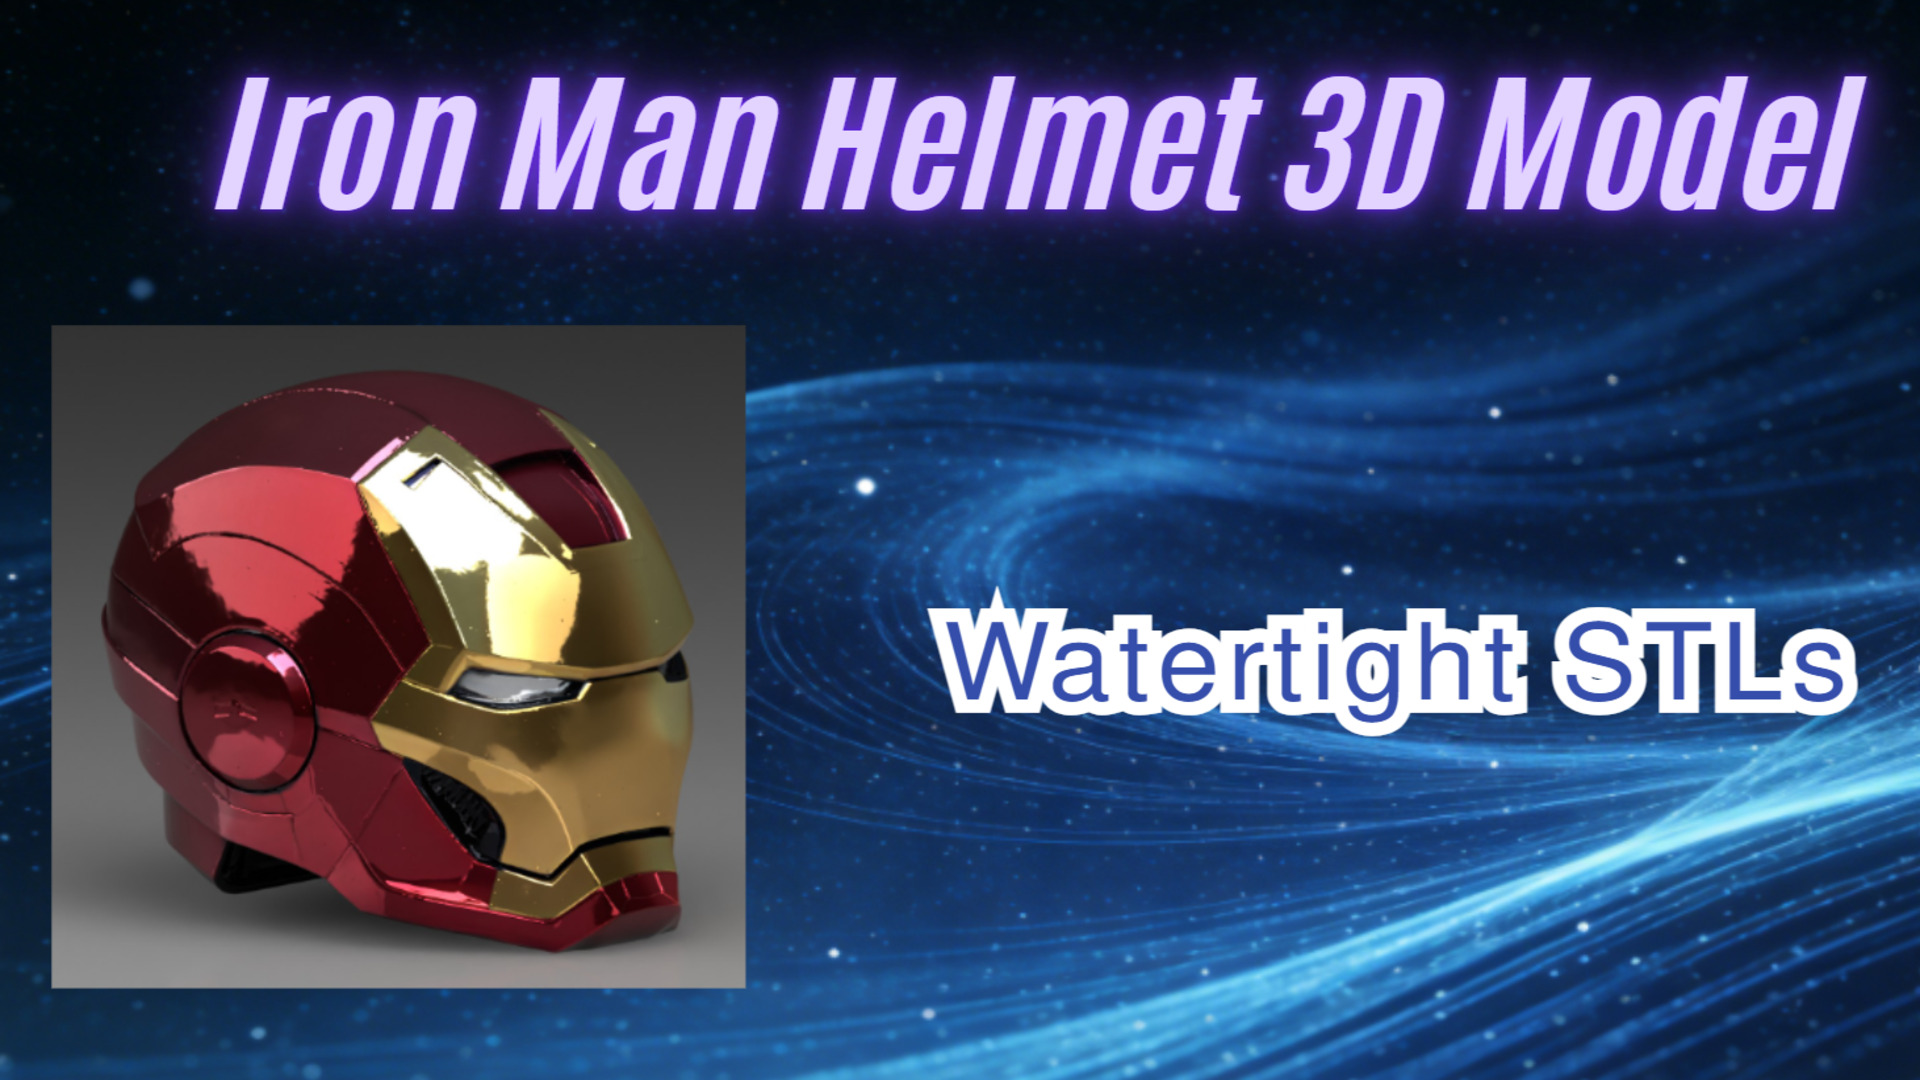
Iron Man Helmet 3D Model: Generate Watertight STLs
Quick Summary: Printing 1:1 scale props carries a massive physical cost. A standard cosplay helmet requires up to 1.5kg of filament and 60 hours of continuous extruder movement. Relying on unverified community files often leads to catastrophic print failures due to hidden non-manifold edges. This guide breaks down the mechanical realities of the 3D printing pipeline. You will learn how the Direct3D-S2 engine generates a mathematically watertight mesh, eliminating the grueling post-processing cycle and delivering a clean foundation ready for your hardware modifications.
Hardware fabrication is unforgiving. When you run a software simulation, an error generates a simple log file. When you run an FDM or resin printer, an error generates a pile of wasted plastic. A 1:1 scale prop build is an exercise in strict resource management. You allocate heavy spools of PLA or PETG filament. You commit your machine to days of non-stop mechanical operation. A failure at hour 55 is a severe financial and temporal penalty.
Most Iron Man helmet 3D model files online are mathematically broken. Makers spend hours scouring open-source repositories for the perfect asset. They download a file, drop it into their slicer, and hope the underlying math holds together. Thousands of makers waste days repairing these broken meshes. This blind trust is a critical vulnerability in the production pipeline.
A visual representation on a computer monitor does not guarantee physical viability. To fabricate a functional piece of armor, you need a rigid structural foundation. You need a model that behaves like a solid object. A watertight base eliminates this risk entirely. We engineered our core generation algorithm to respect the laws of physical volume. By replacing probabilistic guessing with deterministic output, we ensure every exported geometry is ready for the heat bed.
Table of Contents
🔹 Part 1: Why Most Free Iron Man Helmet 3D Model Files Fail
🔹 Part 2: Manifold Geometry vs. The Post-Processing Trap
🔹 Part 3: Generating an Iron Man Helmet 3D Model with Direct3D-S2
🔹 Part 4: Preparing Your Iron Man Helmet 3D Model for Hardware Integration
Part 1: Why Most Free Iron Man Helmet 3D Model Files Fail
The entry point for most creators is a search engine. The instinct is to hunt down a pre-made file to save time. Just as we analyzed the workflow disruptions in the hidden cost of free 3D car models breakdown, community repositories are heavily polluted with flawed geometry. An asset might look flawless in a web-based preview window. The high-resolution textures easily disguise the structural rot underneath.
The moment you import these files into Cura, PrusaSlicer, or Bambu Studio, the illusion collapses. You are immediately confronted with non-manifold edges. A non-manifold edge is a mathematical impossibility in physical space. It occurs when geometry cannot exist in the real world. The slicer software cannot determine what is inside the object and what is outside.
Most AI generators create what professional makers call:
❌ Triangle soup
❌ Non-manifold edges
❌ Unpredictable topology
Faced with mathematical contradictions, the slicer attempts to guess the correct toolpath. It might bridge a gap with flimsy infill. It might skip a crucial structural layer entirely. It often calculates the internal walls as having zero thickness. When the print head reaches these compromised coordinates on the Z-axis, it extrudes material into empty space. The print turns into a stringy mess.
You cannot build reliable hardware on top of a compromised digital foundation. If you want to avoid catastrophic print failures, you must start with a file that possesses strict volumetric integrity from the first layer to the top shell.
Part 2: Manifold Geometry vs. The Post-Processing Trap
Experienced makers are intimately familiar with the 1:3 time ratio. This is the brutal reality of working with poor topology. For every one day you spend printing a complex prop, you spend three days fixing it. You endure hours of scraping, applying automotive Bondo, inhaling resin dust, and waiting for fillers to cure. You are forced to perform exhausting manual labor simply to hide the software’s structural mistakes. This is where most makers lose weeks.
When you attempt to modify triangle soup, your CAD software crashes. Hardcore makers do not just print static busts. They modify the base files. They import the mesh into Blender or Fusion 360 to perform boolean operations.
They need to cut out the jawline to install physical hinges. They need to subtract cylindrical channels into the faceplate to embed neodymium magnets. If you apply a Boolean cut to a non-manifold mesh, the model shatters. The intersecting internal planes confuse the calculation, resulting in corrupted geometry. This forces you right back into the manual repair phase. Learning how to generate a solid, continuous surface is the only way to bypass this bottleneck.

A native watertight mesh allows you to execute complex Boolean cuts instantly. You subtract your hardware mounting points, export the updated file, and send it directly to the printer. The post-processing phase drops from days to mere hours. When you eliminate this trap, you reclaim your week. You spend your hours writing Arduino scripts for motorized faceplates and installing electronics, rather than endlessly sanding digital mistakes.
Deploy Engine-Ready Geometry.
Direct3D-S2 generated meshes achieve extreme slicer compatibility without manual repair. Generate a mathematically watertight base mesh that supports complex boolean cuts.
Part 3: Generating an Iron Man Helmet 3D Model with Direct3D-S2
Bypassing the flawed open-source ecosystem requires an engine capable of programmatic 3D generation. The Direct3D-S2 architecture does not guess at surface details. It processes the full volume of the input data to establish a solid structural base. You can achieve this level of precision by utilizing the best image to 3D model AI workflows tailored specifically for hard-surface reconstruction.
Neural4D generates production-ready geometry, not experimental AI outputs. The technical differentiation lies in our Spatial Sparse Attention (SSA) mechanism. Standard algorithms look at a 2D image and extrapolate a flat depth map. SSA evaluates the internal coordinates. It analyzes the specific boundary lines of the faceplate, the cranial dome, and the cheekbone bevels, calculating the negative space inside the helmet simultaneously with the exterior shell.
The engine rebuilds the geometry using a quad-dominant structure. Quad-dominant topology means the polygons follow the natural mechanical curvature of the object. The edge flow is highly predictable. This is a critical factor for physical fabrication. A predictable edge flow means the slicer can calculate a highly efficient, continuous toolpath for the extruder, reducing print times and minimizing vibration artifacts.
If the baseline generation requires adjustment, you do not rely on a random seed generator to fix it. Our dialogue-based multi-modal capabilities allow for precise, localized adjustments. You use simple text parameters to widen the temporal ridge or sharpen the jawline, exactly as outlined in our text to 3D model AI guide. The algorithm refines the volume while maintaining the absolute watertight integrity of the outer shell.

Part 4: Preparing Your Iron Man Helmet 3D Model for Hardware Integration
A generated asset provides no value if it traps you in a closed ecosystem. The objective is frictionless pipeline integration. Once the topology is finalized, you export the asset directly as an .stl or .glb file. By generating production-ready 3D AI assets, you eliminate the need for third-party mesh repair software. The file is mathematically sound the moment you hit download.
For wearable applications, the next step is dimensional scaling. You import the .stl into your preferred CAD software to establish the physical scale. Because the mesh is quad-dominant and free of dead faces, scaling the object up by 300 percent to fit a human head does not expose hidden polygon tearing. The curves remain perfectly smooth. You use a solidify modifier to assign a precise 3mm or 4mm wall thickness, ensuring the final print possesses the structural rigidity to handle daily wear and mechanical stress.
With a solid wall thickness established, you proceed with digital slicing. A standard print bed cannot accommodate a complete 1:1 scale prop. You must partition the geometry efficiently.
✅ Select the faceplate geometry and separate it cleanly from the main dome.
✅ Execute boolean subtractions to create channels for LED eye installations.
✅ Model registration pegs and cut corresponding holes along the seam lines.
✅ Export the individual components directly to your slicer.
These operations take minutes when the underlying math is correct. If the mesh cannot survive a standard boolean cut, it has zero value for hardware integration. When you convert image to STL file using Neural4D, you guarantee that downstream mechanical modifications will execute flawlessly.
Move directly to physical fabrication.
Upload your reference data. Generate a clean .stl base. Scale it, slice it, and send it to your printer without fighting corrupted topology.
Frequently Asked Questions
What is a Watertight Mesh?
A watertight mesh has a continuous, closed surface with zero holes, zero zero-thickness walls, and zero non-manifold edges. Mathematically, it completely encloses a specific volume. This allows slicing software to accurately calculate the infill and perimeter paths without guessing.
Why do free STL files crash during boolean operations?
Free files are often compiled from poorly optimized game assets or quick 3D scans. They contain intersecting internal planes and flipped normals. When you apply a boolean cut, the software cannot resolve the conflicting geometry, causing the mesh calculation to fail entirely.
How does Spatial Sparse Attention (SSA) improve hard-surface models?
SSA focuses computational power on identifying structural boundaries and sharp mechanical edges rather than guessing random surface noise. For armor and hard-surface props, this results in crisp, defined bevels and flat planes that do not require heavy digital smoothing.
Can I scale these generated files for 1:1 wearable props?
Yes. Because the output is a quad-dominant, manifold structure, you can scale the geometry to fit physical measurements in your CAD software. The surface will maintain its integrity, allowing you to add the necessary uniform wall thickness for FDM extrusion.
Part 5: Conclusion – Print Your Next Prototype
Your hardware is only as reliable as the data you feed it. Wasting days of machine time on a flawed digital asset is an unacceptable workflow for any serious maker. By utilizing native volumetric algorithms, you bypass the manual repair phase and secure a mathematically sound foundation. Take control of your fabrication process. Generate an engine-ready Iron Man helmet 3D model, drop the watertight mesh straight into your slicer, and execute your physical build with absolute certainty.
Build a Mathematically Sound Foundation
Upload your reference data to the Direct3D-S2 engine. Export a clean, watertight .stl file that drops directly into your slicer without manual repairs.