How to Generate PBR Texture from Image with Neural4D TexTrix
In the high-pressure development cycles of 2026, material creation should not be the bottleneck that stalls your project. Most indie developers have faced the specific frustration of trying to extract a usable texture from a photo, only to find ugly stretching and broken seams on the complex edges of their 3D models. To stay competitive and maintain high visual standards, you need a more reliable way to generate PBR texture from image. Neural4D TexTrix transforms this process by treating materials not as a flat 2D skin wrapped over a mesh, but as native physical attributes born within a 3D volumetric space.
Technical Deep Dive: Explore the Neural4D TexTrix
Table of Contents
Part 1. The Engineering Bottleneck in Modern Texturing
Authoring professional materials typically requires jumping between multiple software tools. You typically clone out highlights in a photo editor, bake normal maps in a separate utility, and then manually align UV coordinates in your DCC tool to hide seams. This fragmented workflow is objectively slow.
Recent market data from 2025 art production surveys indicates that small to mid-sized studios now spend over 40% of their total art man-hours on material calibration and UV cleanup alone.
As player expectations shift toward 4K PBR standards across all platforms, this manual “patch-and-fix” model is no longer financially sustainable for small teams. By adopting a pipeline to generate PBR texture from image through automation, you reclaim these hours for high-value tasks like environmental storytelling and lighting design.
Why spend days on a single asset when you can automate the grind?
Experience the Future of Texturing
💡Pro Tip for Asset Capture
To get the best results when you generate PBR texture from image, use photos taken in neutral, overcast lighting. This minimizes “baked-in” shadows, allowing the de-lighting logic to more accurately capture the base reflectance of the surface without interference from harsh directional light.
Part 2. Breaking the 2D Projection Barrier – DiT and Attribute Grids
Legacy AI texture generators perform simple 2D image enhancement. They lack an understanding of 3D volume, leading to errors in self-occluded regions – like the inner parts of a mechanical joint or deep folds in fabric. TexTrix addresses this with its Diffusion Transformer (DiT) architecture equipped with sparse attention.
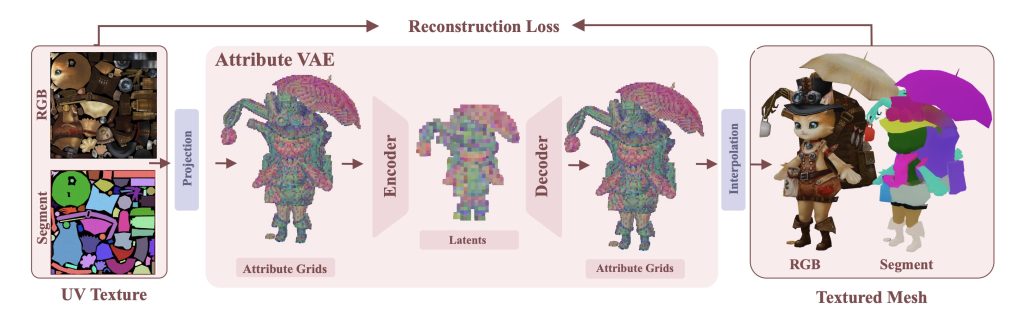
Unlike traditional methods that “paint” on a mesh, TexTrix utilizes a Latent 3D Attribute Grid. This is a sparse voxel field that stores color, semantic labels, and PBR parameters directly in 3D space.
✅ Spatial-Aware Conditioning. When you generate PBR texture from image, the DiT architecture ensures the visual data from your photo is projected precisely into the 3D grid. It does not just copy pixels; it plausibly completes hidden regions based on the object’s geometry.
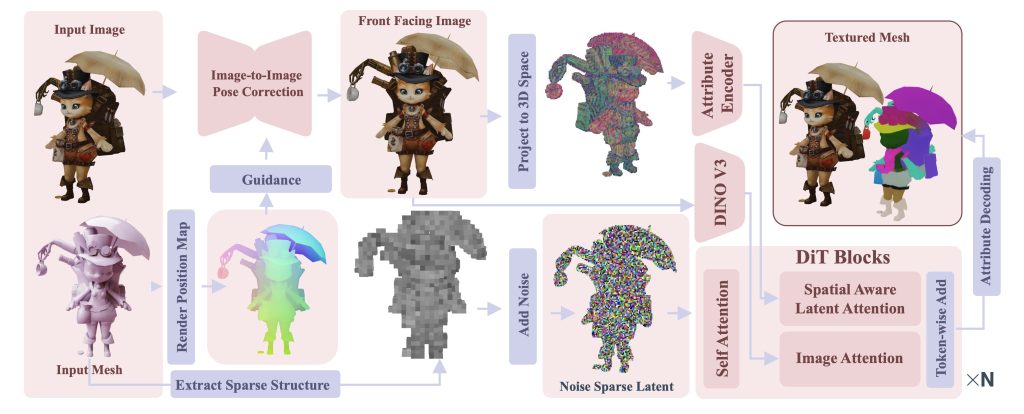
✅ Native 3D Completion. Traditional projection creates “streaks” on vertical surfaces that the camera did not see. TexTrix uses its generative core to fill these gaps with textures that match the surrounding material logic.
✅Semantic Material Logic. The system recognizes the difference between oxidized metal and dull plastic. It automatically assigns accurate roughness and metallic values based on the semantic properties of the voxels.
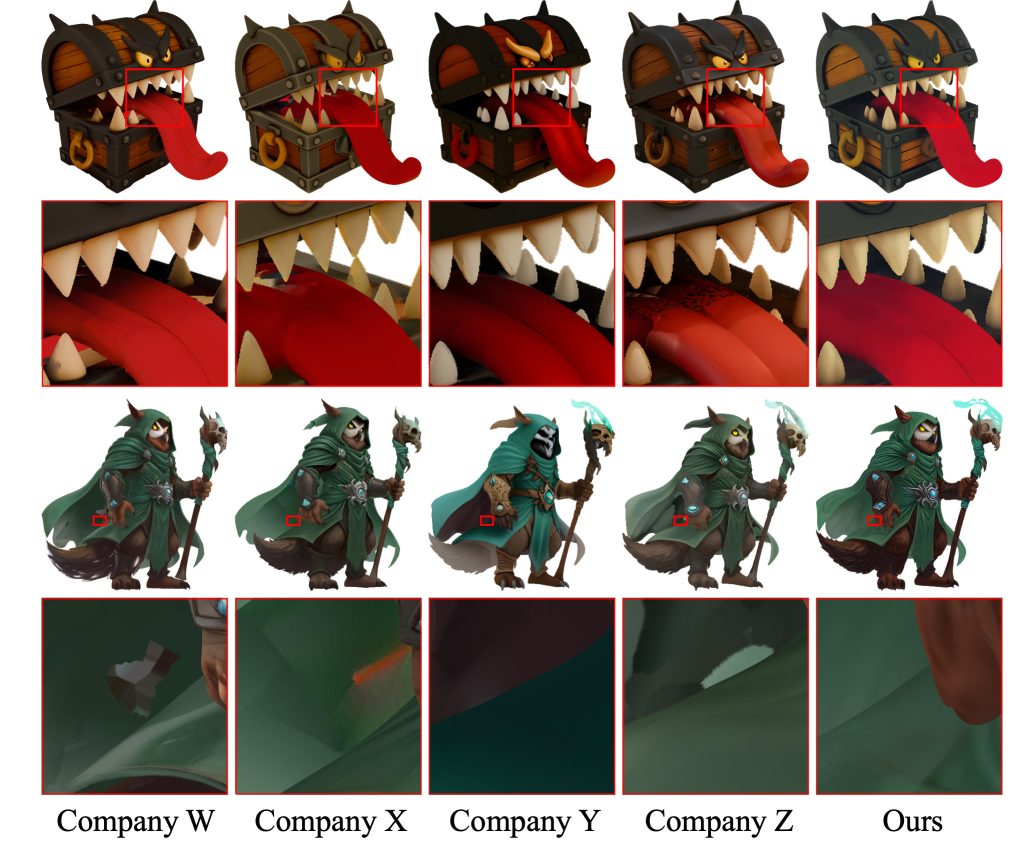
Part 3. Deep Comparison – Native 3D vs. Multi-view Projection
To understand why this matters, look at the failure points of standard tools like Paint3D. In a typical scenario involving a complex object – like a mechanical robot or a character with overlapping armor – 2D-based AI often creates “texture bleeding” where the texture of one part spills onto another.
TexTrix avoids this through its volumetric approach. Because the attributes are tied to 3D voxels rather than 2D screen space, there is zero risk of texture bleeding. The result is a clean, engine-ready asset that requires zero manual overpainting. Comparative tests show that TexTrix maintains surface coverage even in 90-degree occluded areas where other tools produce blank spots or blurred pixels.
Part 4. Professional Specs and Engine Integration
A professional blog must address pipeline compatibility. TexTrix produces high-resolution outputs that can be exported as packed ORM (Occlusion, Roughness, Metallic) textures.
| Feature | Standard AI Projection | Neural4D TexTrix |
| Texture Consistency | High risk of “streaking” | Pixel-perfect 3D alignment |
| Occlusion Handling | Blurry or blank spots | Generative spatial completion |
| PBR Logic | Manual channel tweaking | Automated physical inference |
| Export Format | Simple RGB / Diffuse | ORM / 5-Channel PBR |
These maps are optimized for Unreal Engine 5’s Lumen and Unity’s HDRP. In real-world testing, teams using generative PBR pipelines have reported asset iteration speeds 5 to 8 times faster than traditional methods. For a studio producing hundreds of environmental props, this represents a significant reduction in the “Cost per Asset,” allowing indie developers to achieve AAA-level surface detail on an indie budget.
Part 5. Scaling Production for Small Teams
The move toward attribute-centric asset management is not just a trend; it is a necessity for the “Solo-plus” developer era. As the 3D software market is projected to reach over $15 billion by 2028, the demand for high-quality, reusable assets is exploding. Tools like TexTrix democratize high-end texturing by removing the hardware and skill barriers previously required for photogrammetry or advanced procedural shading.
Whether you are building a modular sci-fi corridor or a detailed character asset, the ability to generate PBR texture from image in a matter of seconds changes your relationship with your asset library. You are no longer limited by what you can manually paint; you are only limited by what you can reference.
Ready to Scale Your Production?
Join thousands of developers using Neural4D to slash their texturing time
Conclusion: Elevate Your Assets Today
Stop wasting your time on the mechanical drudgery of UV stitching and manual channel calibration. Shifting to a native 3D attribute model is the most effective shortcut to elevating your game’s visual quality without expanding your team size. Now that you know how to generate PBR texture from image with professional-grade accuracy, it’s time to put these tools to work.
Ready to transform your workflow? Explore the interactive results and start generating your own 3D materials with Neural4D today. Your next high-fidelity asset is just one photo away.